Sidebar
Table of Contents
DOGA Tips
DOGA is a program that's great for making pretty cool 3D art in not a lot of time. It's somewhere between a real 3D modeling tool and legos. It's also pretty easy to use and is a lot of fun!
You can get started here: Getting DOGA. There are other parts out on the internet, but they're hard to track down. If you missed it, you can get the 'SARP DOGA' pack from here.
UI
The DOGA 'Object Designer' UI is simple.
Views
You have a four Views - Top, Side, Front, and 'Rendered'. Each of the views is restricted to two axis (X, Y, and/or Z). You can interact with parts from any of the four Views. For the most part, you'll select existing parts through the 'Rendered' view and make modifications in the Top/Side/Front views.
Top Menu
You'll primarily work within two of the menus at the top of the application. I won't cover everything here, but 'advanced' menu use will come up later.
Edit
Get used to using 'Ctrl+Z' for 'Undo' if you don't already do that. You'll be doing it a lot, so save yourself the headache.
The other part of this menu that you'll be using are the 'Duplicate' commands. You'll use these a lot. We'll talk more about them later.
Part
You'll likely use all of the options in this menu regularly. Get comfortable with clicking on this.
Add a Part/Add a Part from File
Lets you add a part. Covered in more detail below.
Replace a Part/Replace a Part from File
Not something that you'll do a lot, but if you have one part and you wish it were a different part - this is your choice. Preserves scaling, rotation, etc of the original part and applies it to the new one.
Useful if you start making your own parts.
Initialize Rotation/Scaling/Camera Position
The first two choices, for Rotation and Scaling, are great ways to simplify re-using parts or starting over if you're unhappy with your current approach to a part. You won't use this constantly, but it's very useful when it comes up.
The 'Initialize Cameras Position' doesn't get used much, but is useful if you get lost.
Display
For now, just worry about 'Rendering'. This will let you see a more polished version of your model with all of its effects applied. You can then save the picture. I recommend '.png' for file type, with both boxes checked so you get transparency. It'll make sense when you try it.
Basic Controls
The best way to learn DOGA is to practice on your own, but here's a crash course. Please follow along. :)
If you haven't already arrived at the screen to make your own model, choose 'Design an Object' from the main DOGA menu. The other options aren't relevant right now and you may never use them.
Now, let's add a part. From the top menu, choose 'Part' and then 'Add Part…'. Pick any part you like. We'll talk about a broader parts selection later on.
Now that you have a part, you should make sure it's selected. A selected part flashes yellow. You can deselect parts by right-clicking somewhere else. You can select a part by clicking on it in any of the four views of your current object. I usually use the one that isn't a wire frame - as you add more parts, the wire frame gets progressively harder to use for selection.
You can select more parts by 'Shift+Left Clicking' them.
You can remove a part from your current selection by 'Ctrl+Left' Clicking it.
You can select or deselect multiple parts by clicking and dragging your mouse instead of clicking a single time. Works with 'Shift' and 'Ctrl'.
Camera
Now that you can select/deselect a part, let's learn the camera.
DOGA has some buttons to manage the camera, located at the top-right as big red arrows. These can be okay for fine detail work, but aren't recommended for regular use. They're just too slow compared to using the mouse.
Rotate
Hold right-click on the screen with the textured part and drag your mouse around. This will rotate the camera around the center of your current view. You can 'Ctrl+Z' to undo your camera changes if you make a mistake.
Pan
Hold Ctrl+Right-Click to 'Pan' the view from side-to-side.
Zoom
Hold Shift+Right-Click to 'Zoom' the view in and out. You can also use your mouse wheel.
Part Manipulation
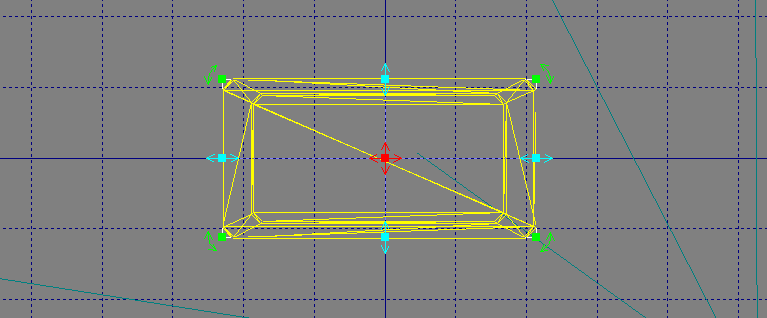
With a part selected, you have a few options for changing it. With a part selected, look at the wire-frame views. You'll see a box around the part with arrows in various locations.
All manipulations are restricted to the axis of the view you're interacting with them on. For example, the 'top view' cannot move things 'Up or Down', but can move things side-to-side and front-to-back.
Most of these changes can be undone during the change by right-clicking. You can also 'Ctrl+Z' any changes you make, including moves, deletions, scaling, etc.
Modifiers
There are two modes of granularity when you're moving parts. I prefer to have 'Grid Fitting', found under the 'Setting' menu, ON. We can use other buttons to move more finely later, but the grid makes it very easy to place things consistently. This is super important for mirroring, which we'll talk about later.
Shift
Holding 'Shift' restricts your current action to a single axis. If you want to move something side-to-side, but not front-to-back, you can hold Shift to make this easier.
Ctrl
If you have 'Grid Fitting' on, holding 'Ctrl' lets you make actions without snapping to the grid. If you don't have 'Grid Fitting' on, then this makes your actions snap to the grid, instead.
Shift+Ctrl
Does both of the above modifiers simultaneously. Useful!
Move
Moving a part is simple. The center red arrow, that points in four directions, allows you to pan a part around. Just left-click the red arrows and drag.
Use the modifiers ('Shift'/'Ctrl') to improve your control.
Stretch/Squish
The light blue arrows allow you to Stretch and Squish a part. Incredibly useful and lets you use the parts in a lot of new and useful ways.
Shift
While 'Ctrl' still works as normal, holding 'Shift' will scale the entire part instead of stretching or squishing it. If you want the whole thing to be smaller or larger, use this.
Rotate
The green arrows at the corners of the selection box let you rotate. Rotations are restricted to the current view, so you will often rotate something in one or more views.
You can use 'Ctrl' to make finer adjustments.
Palette
The Palette menu is a whole thing on its own and is best learned by experimenting. In the 'Part Attribute' window, usually bottom-right, you'll see 'New', 'Edit', and 'Delete'. You can use this to set colors, apply textures, change how the part looks (transparent, reflective, glowy, etc), and more. Once you've saved a color, you can continue to use it over and over. Just select a part, click the color.
A good tip here is to use the '
Parts Selection
The default parts options are pretty good for getting started. Personally, I make most of models without ever opening the 'Add Part…' menu and entirely use the 'Add Part(s) from File(S)…'. This isn't because the default menu is bad - I just prefer the wider parts selection available from the file browser.
A big part of how good your model will come out is based on your familiarity with the available parts. You'll only build that familiarity by making more stuff in DOGA, so even if your first model is not the greatest - don't get discouraged! Just keep playing around and practicing. You'll also build up a toolkit of tricks that help you make things faster and better.
All that said, let's talk about how we select a part.
First - what are we trying to accomplish? Are we building an engine, a fuselage, a hand, a gun?
Having a basic mental image of what you want to build is an important first step. Basic is important - you don't need to be able to 'see' the finished product in your mind. A lot of what I do is grabbing different parts, seeing how they fit, and getting new ideas from that. It's very okay to end up with a different design than what you thought you were starting with.
Sometimes the finished design is very different from what I had in mind at the start. That's not a bad thing! But you still want some basic idea of what you're trying to accomplish.
At the end of the day, the parts we can use in DOGA are both restrictive and freeing. Some parts are too basic, others are too detailed, we can't always find the exact shape we're looking for - but those same restrictions sometimes open up new ideas!
Templating
The first thing I do when I'm making a new model is something I call 'templating'. I'll grab some 'rough' parts that I may not intend to use in the final model that are close to the shape I want. If I want to make a ship, for example, I'll add a default ship body, some engines, etc, and move them around to get a feel for the basic layout of the model.
This does a few things.
First, it lets me see if the idea I have is a good one. Sometimes, when things are laid out in 3D, the idea I had in my head just doesn't translate well. Sometimes, I get new ideas. These are both good things.
Second, if I do like the current layout, I can use this template to guide my future parts selection.
For example - if I wanted to make the Death Star, I would probably start with a big sphere. There are a lot of reasons why the final design shouldn't be a simple sphere - it lacks detail, makes assembling the equatorial 'trench' impossible/tricky, etc. But it's great for getting started!
Stretching/Squishing
There are thousands of ways to use each part in DOGA. Depending on how you stretch, squish, and rotate the parts, you can get a massive range of options.
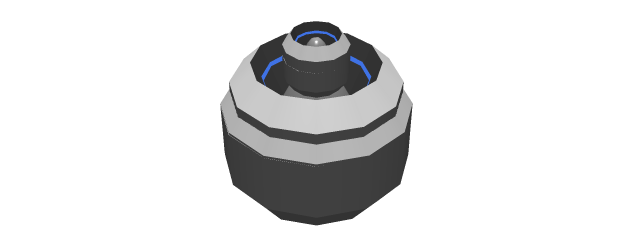
The above is a single part modified into 5 different things. I see a laser emitter thing like the 'War of the Worlds' Martians, a glowy disk detail thing, a jet engine or laser barrel, a speaker, and a small thruster - or air vent - or futuristic tire.
Being familiar with the available parts and finding cool ways to use them is massive. I have a small handful of parts that are my go-to's because of how flexible they are - if you look at my models, you'll often see the same basic parts used over and over for detail, structures, and more.
Stacking
In addition to all the things you can do with a single part, you can also create 'new' parts by smashing two parts together. DOGA will let you overlap parts in any way you'd like. If you can't quite find the shape you want, or you need more detail than what is available, why not make it yourself?
That's the same part from above scaled, rotated, and stacked. No idea what it is, but it's got a neat look.
Duplicate, Duplicate, Duplicate
Duplication is extremely important and a MASSIVE time saver. Make sure you build around the center lines (the darker blue ones) so that you can effectively 'mirror' things from side to side, front to back, etc. If you're building a spaceship, you don't need to make both sides the hard way - make one side and then duplicate in the appropriate direction. Making a fighter? Add a wing, Duplicate Right/Left, now you've got two wings.
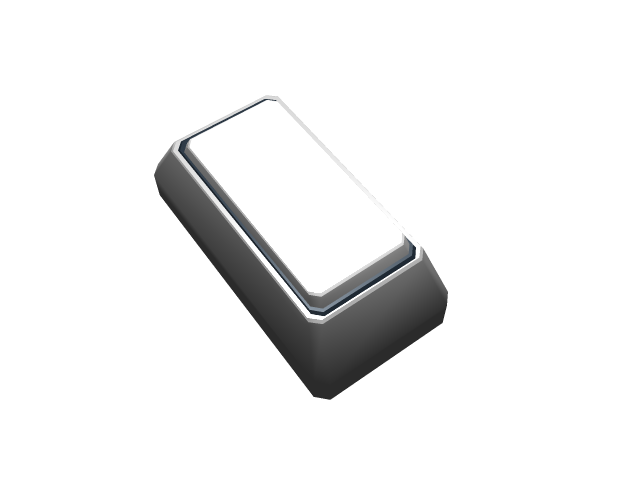
I use something like this for my 'buttons'. It's a single part that has been duplicated twice, so there's three of them. The top one looks like a button you can push, then there's a button 'case' that it might slide into. The last copy is black to give the illusion of depth and/or shadow - I don't always include this, but for such a close-up view it seems appropriate. I saved a lot of time by using the 'duplicate' option from the menu instead of going into the parts browser every time.
One simple tip - seriously, if you're building something that's symmetrical, like a fighter or ship, save yourself the hassle of building both sides at the same time. Do it as needed. Select the entire half you've made, duplicate it left/right (or top/bottom, etc), see if it's looking right, then delete/undo. Rinse and repeat until you're done or ready to start doing asymmetric details.
I can't stress enough how useful Duplicate is. It's the best 'cheat' in the entire program.
Clipping
So, we're rotating, stacking, squishing, and more. It's great! But sometimes things don't match up well. Part of a detail gets cut off in a way that doesn't look right, two shapes don't meet cleanly, etc.
A lot of your time will be spent fixing this. Sometimes the way two things merge together looks great and you don't need to make any changes. Sometimes they don't.
Common fixes for a bad clipping issue:
- Scale up/down one of the parts. This often fixes it easily.
- Rotate one of the parts so that the way they overlap looks better. This is especially useful when you've got two round parts, or parts with a lot of details, meeting. Experiment a lot.
- Add a new part to cover up the joint. I use this a lot. The 'basic' shapes are especially good at this, like the various pillars and cubes, because the simple shapes tend to merge into the other shapes nicely.
- Sometimes, a part just doesn't go into another part smoothly and can't be fixed. Accept it and move on or find a new part that fits better.
A great model can be ruined by bad clipping. It makes your creation look like a bad old PS1 game and many gamers are 'trained' to look for these because of how much they stand out. Do your best to keep all your joins clean.
I've left some 'bad' clipping in place on some examples below - see if you spot it and think about some ways that it could be fixed!
Last thoughts on Parts Selection
All of the parts in DOGA are useful at some point or another, especially with the above in mind. One thing that I think is easy to overlook is the variety of 'basic' parts - IE, cubes, spheres, planes, pillars, etc. I use these constantly to fill in gaps, add detail, creating templates, or even as the main shape.
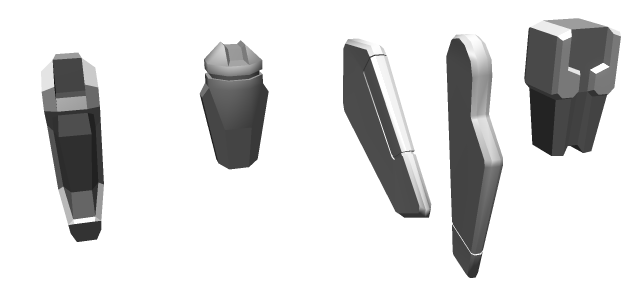
Here's some of my favorite parts, all found in the 'roetc' folder:
For fun and practice, I've built little robots, cars, jets, etc, out of only one of these parts at a time in a dozen different orientations and uses.
A Basic Build
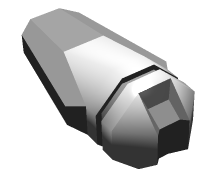
Using what we've discussed already, let's build a simple something. I'll use one of the parts I said I liked as a base. Rotating it around, I think it could turn into a cool fighter or shuttle, depending on how things go.
I think repetition of parts in a model is a great thing because it establishes some consistent shape language. You don't want to go overboard and make it really obvious, but at the beginning of making a model it's a good practice. Bonus points for this approach is that you don't have to keep looking around in the file browser - you can just duplicate all you want.
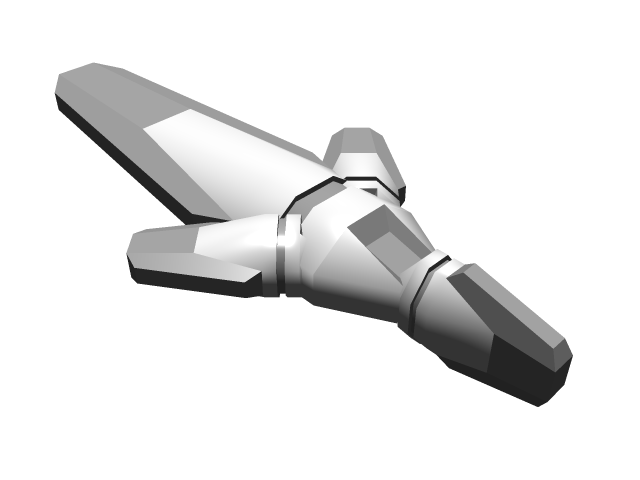
With this orientation, I can 'see' where we might add a fighter's nose section, add wings, and more. If we rotated it, it might make a cool shuttle. Stretched, I could see it turning into a knife or sword. I've stretched it really wide before and used it as part of a mech's head.
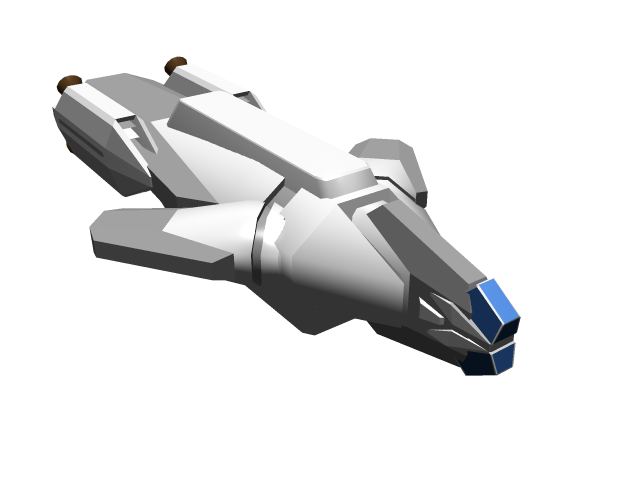
Still using the same part, this model is starting to get some potential. It could be a sword's hilt and guard with a little modification. It could be a Firefly-style transport of some kind. With some more sharp/dramatic parts, it could become an aggressive fighter. It could also be the foot of some robotic bird or lizard creature. And so on.
The Last 20%
There's a saying that 'the last 20% of the work takes 80% of the time' or something along those lines. The difference, in my opinion, between a truly great model (or anything, really) is the amount of time put into it. Most of my models take between 4 and 8 hours; sometimes more if they're really complex (like a Frame) or less if they're really simple (like a basic transport or some little tool). I try to set a high bar for my creations - I want them to feel real, like I could really see someone using them as-is.
With that in mind, here's some questions to get things started:
- How do people use this?
- If it's a vehicle, how do they get into it? Can I make it so that the entry/exit of the vehicle actually work? IE, can I make a door or cockpit that I can show open?
- If it's a device, does it look like it could be held? Does it have sufficient details to feel like someone could pick it up? Does it look like it's light or has heft?
- How does it work?
- If it's a weapon, does it use ammo? Where does the ammo go in? How does the ammo move around inside of the weapon? How does the person fire the weapon?
- If it has thrusters or an engine, what is it connected to? Do I want to show it (like a motorcycle's exposed engine) or do I want it to look like it's being hidden intentionally (like an armored panel or something)?
- If it's a vehicle, how does it get around? Do the wheels look like they can turn? Does it look like it can take off/land?
- Does it look 'real'?
- Small details go a long way to selling that something is real. Little touches like bolts or screws, buttons, pipes, labels, etc, do a ton for realism.
Techniques for the Last 20%
With the above questions as a starting point, how can we address these quickly?
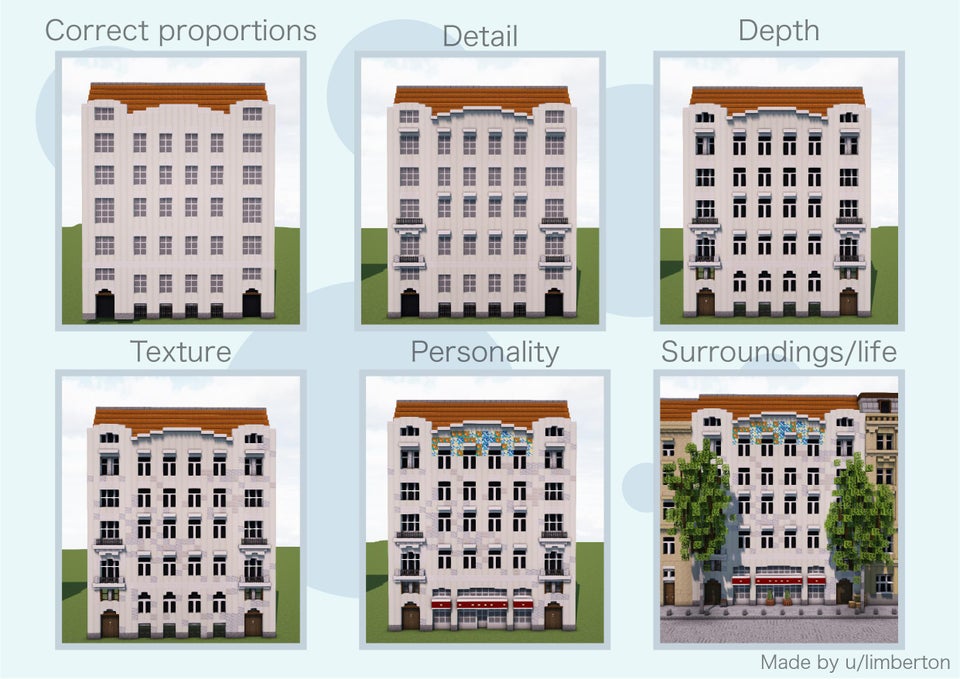
The above image is what kicked off this entire article. Each stage is so appropriate when thinking about making a great DOGA model, so I'm going to riff on it and follow its steps.
Correct Proportions
I've made a lot of things that didn't look right. Often, I couldn't quite place my finger on why.
Our brains are really good at pattern recognition. That means that if we present our brain with a pattern that doesn't fit, it really stands out. This is especially true for every day objects. The problem is that we can't always identify why it doesn't seem right.
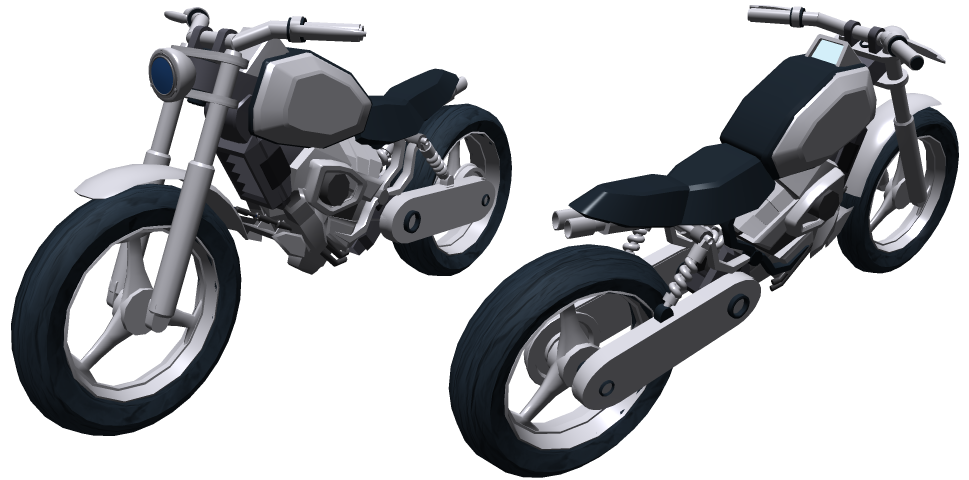
I was making a motorcycle at one point and it just didn't seem right. I felt like I had all the right parts in the right place. It had good detail. So, why did it not look good? I looked up some motorcycles online and realized that some of my proportions just weren't accurate. The handlebars were too small, the back tire wasn't wide enough (a motorcycle often has a wider or thicker back tire than front tire, whereas bikes or motorbikes tend to be the same size), etc. Without needing to add any new parts, I fixed the scale of the existing parts and suddenly everything clicked.
Using existing references will go a long way. Obviously, we don't want to copy things exactly (unless they're a common, non-copyrighted thing) - but if I want to make a motorcycle, I should probably know how motorcycles look.
Detail
There's a lot of ways to tackle adding detail.
One way is through 'greebling'. This is a time-honored practice of adding little bits and pieces to a model. You can watch videos on the topic for classic Star Wars, Battlestar Galactica, Star Trek, and more. It's so important that the most popular greebling parts have been 3D scanned and are now added to digital models.
Another way is to simply think through how it works and find ways to convey that. Does it have joints? How much detail is appropriate? Are you using one big part for the thrusters when you could use a few small ones and gain some articulation? Etc. Sometimes it's worth adding detail to sell a movement - things like hinges - even if they aren't strictly necessary because it helps to convey purpose. A flat square on the side of a hull might be a door to you, but without hinges or airlock details, how would someone else know what you meant it to be?
Adding a small detail to a piece suddenly makes it look larger. Adding a big detail to a piece might make it shrink. Add too many details and it might start to look too busy or grungy - not enough and it looks too clean. Sometimes, 'too clean' or 'too grungy' is exactly what we want, so don't be scared to experiment.
Just like proportions, our brains have been trained to look for certain things that identify an object as a 'real' version of that object. A car or bike without rims on its tire would seem strange. Little details like springs, buttons, different types of materials, etc, can be crucial to making a model look good. The motorcycle model above is unfinished, but a lot of the key details are there to make it recognizable for what it is without forcing you to suspend your disbelief too much.
The right amount of detail can be the difference between a good model and a 'bad' model, so put some real thought into this!
Depth
It's easy to use pre-existing pieces in DOGA for cockpits, doors, etc, but they tend to be very flat. The lack of transparency on the glass pieces of the default parts makes them feel somewhat fake, too. I usually avoid the default cockpits for this reason, as well as a lot of other parts.
There are ways to rebuild these things using the other parts and get a better result.
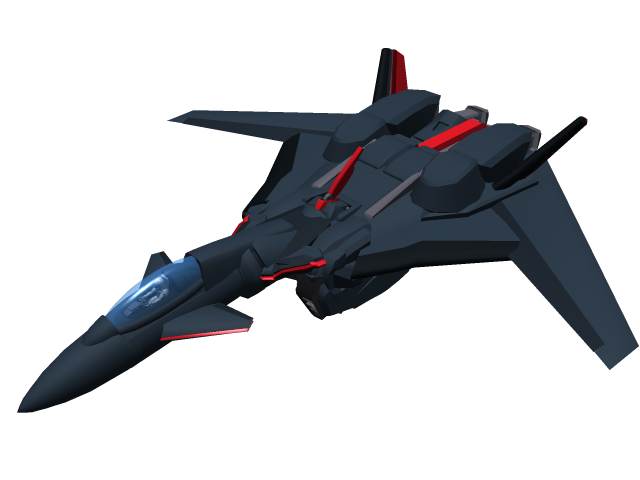
The cockpit glass is just a sphere that's been shaped into an oval. Half of it is lost in the body of the fighter's nose. For the rest of the fuselage, I could have used one of the pre-existing fighter 'fronts', but I use a 'rocket' piece for the nose tip and a cylinder that has a hollow section for the 'body' of the cockpit, so that the cockpit could actually have someone sit inside of it and pick up some more detail.
Similarly, the cowling at the back of the canopy could have been a block with a flat end, but I chose to use a piece that was 'hollow' so that it sat on top of the glass instead of having the glass stop immediately at the shape. That adds depth and interest.
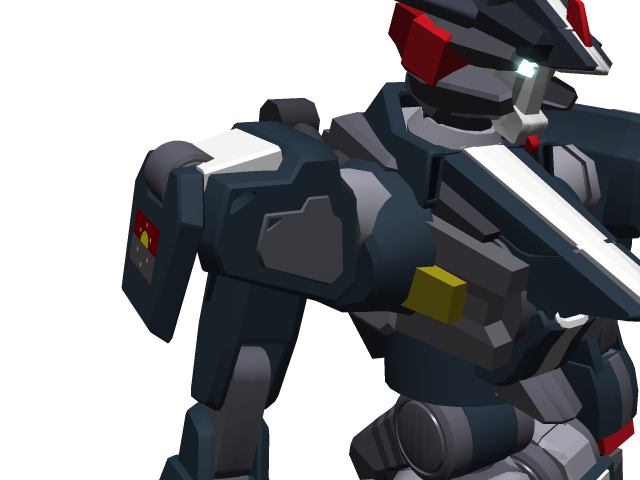
One easy trick to add depth to a model is to pick a big part, duplicate it, and reshape it just a little bit so that it sticks out of the original part in a way that looks good. This is a great time to add color to the newly created part.
You can see on the shoulder and chest that I've just copied a part and changed its scale slightly, then applied a new color. In that picture alone it happens at least six different times. Can you spot them? Done well, these details don't stand out as 'this is a copy of a part!' but feel like they were always supposed to be there.
Texture
The main way to add texture is to use Palettes. Choose your colors well, change their material types, etc. If something is mechanical, I like to use one of the two default gray textures with the 'Metallic' material. Play around with this to find out what works well for you.
The different materials all do certain things well. I use 'Rough' for a lot of my models, especially for things that should look like painted metal, because 'normal' often looks like plastic. The default 'metallic' works pretty well.
'Glass' looks pretty fake for a lot of applications - bump the 'extent' to ~10% and lower the transparency to get a feeling like thicker glass. Definitely one of the materials that needs the most tweaking.
Low and High Emission are your glowy bits. Low emission looks like a flat, bright color regardless of where it's at. It doesn't cast a lot of light on its own. A smart phone or monitor screen during the day are good 'low emission' candidates, because they don't really take shadows and do have their own light, but don't tend to cast shadows or light on nearby objects unless it's dark.
'High emission' is great for boosters, glowy bits, and more. Often, the default brightness/glow is too high - so do go in and make adjustments until it feels right. Something with too much glow is a great way to 'kill' scale. The engines on Star Destroyers are massive, but they don't cast so much light that you can't see the detail of the mechanical bits around their thrust. By contrast, a bright light on a hand-held device, like a flashlight, might cast a larger light than the object itself.
It's tempting to use some of the default textures for metals and the like, but I recommend against it. The amount of control you have over the textures is pretty limited. If you are comfortable putting in the time to make the texture work well, you can get good results! Otherwise, stick to predominantly flat colors and let your materials do the talking.
If you think about most of the things you interact with, texture is often a second thought. Some caveats on that statement:
- When you get closer to something, texture starts to matter more. Small objects likely need more texture work than large ones. A tire doesn't look quite right without a rubber texture, for example.
- Some things care a lot about texture. Bricks, skin, wood, etc.
In closing on this one - my 'style' focuses largely on colors and materials applied to parts that have been strategically placed. I think it works well for large objects (like fighters, starships, frames, etc) and has done pretty well for smaller ones, too.
Personality
This falls in with the 'Detail' step somewhat, but this is small stuff that isn't strictly necessary but adds color and helps to ground something in reality. The picture above added a store front and flowers to a building that was perfectly 'real' before - but as soon as those details were placed, the building suddenly has so much more character. The same is true for your designs, as well.
I love to use labels/decals at this stage. Who made it? Do they have a logo? Let's make a texture and slap the logo on there. Got a console or screen? Maybe go make a screen in paint/photoshop/etc and add it in.
If your model is a 'unique' something, maybe add in some wear-and-tear or exposed/non-optimal components. The Millenium Falcon has a ton of personality - a big part of that is all the random bits and pieces all over the body that don't strictly need to be there, but add so much visual interest. It doesn't look 'new' and is better for it.
“Ba nuh nuh nuhhh!”
Surroundings/Life
This one can be more tricky in DOGA because so much of what we make is meant to sit in space or go onto a wiki. We're not placing it into the world in the same way that the example image is.
But there are still things we can do.
If we're making a space station, it may look small without some hints of smaller craft near it.
We can try and find other ways to make it feel like the model can be interacted with by real people. Maybe there's a panel that looks like you could pop it off to put in batteries. Maybe there's a control panel, or steps, or any of a dozen other things that aren't strictly about function but about how people touch and use your object.
Time
“Anything worth doing, is worth doing well.”
That's not always true, but when it comes to a good DOGA model? Definitely.
I challenge you to continue to put time into your models until they feel like they could fly/fall/walk off the screen. Be savvy with how you add things so that you aren't simply slapping pieces on forever, but time spent being thoughtful will go a long, long way with how you, and others, are with your new creation.
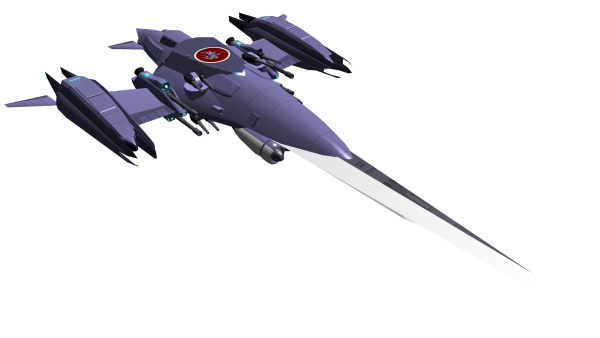
I love the Plumeria's design. It's one of the things that made me want to learn DOGA in the first place. It has a lot of big, bold shapes and clear color blocks. It also has a lot of small details - look at the little glowy bits or how there's an appropriate place for its turrets to mount to. It's got the Hinomaru on top and, in front of that, a hint of a bridge. It sells its scale well without being too busy.
Many of the models I've worked on could have been done in the first couple of hours. This fighter's body looks pretty good or that device looks pretty functional - these should be your starting points, not your destination.
Feedback
You're part of a big community on SARP. The people here are great sources of feedback.
I love sharing in progress pictures when I think I've gotten to a good spot. First, it's a great way for me to hold myself accountable for actually finishing the model. Once I put it out there, I feel like I have to show a 'final product'. I get energy from other's reactions and, even better, people will share their thoughts on what could be different and I can take that new perspective to improve what I've made.
Remember that you are not your creation. If people don't like it, it doesn't mean that they don't like you or that your time has been wasted. Ask follow-up questions if you think someone doesn't like what you've made - “What seems wrong about this?” “Do you have any suggestions?” “Is there anything like this that you did like that you could show me a picture of as a reference?”.
You don't have to listen to any feedback given to you. It's your creation. However, you will likely find that a 'yes, and…' attitude will lead you to something even more cool than what you started with. Just don't lose the identity you set out to create - unless you want to.
Pose your Stuff
If you're building a robot, ship, or anything else that isn't static when it's being used, find ways to pose it.
For ships and fighters - if they have turrets, rotate them outwards a little bit. If you put flaps on the wings or something like that, maybe open them just a little bit for visual interest. It's a good idea to have a 'basic' view and then some more interesting views if your model supports it. Not all do.
For robots (frames, mechas, robots, etc), the difference between a good-looking model and a bland one isn't always the model itself - sometimes it's the pose!
Before getting into posing tips, a few word of 'warning': if you intend to use DOGA's 'multi-object' mode to make your stuff poseable, doing it in 'object' mode will cause you some minor headaches later on. A joint that's already rotated still tries to orient itself around the original axis that it had when it came into multi-object mode. Put more simply, your joints aren't going to behave the way you want them to and it's going to make you do a lot of unnecessary tweaking to your poses.
Two options for this:
- Do all of your posing in the multi-object mode. This can be a headache since any changes you make to the main model won't automatically carry over to your model's “sub-objects”, but it's really not that hard to correct.
- Before turning your model into “sub-objects”, undo any posing you might have done as best as you're able to get the limbs and such into a default pose oriented along the X,Y, and Z axis. Modelers and animators often refer to something like this as a T-Pose, but the arms being vertical is okay, too.
All that out of the way, regardless of where you decide to pose your robot, here's some quick and simple ways to make it pop:
- Rotate the arms at the shoulders (with the rest of the arm attached) just a little so the arms aren't straight up and down. It only takes a few degrees of rotation to add character. You may also want to rotate the shoulders back just a little bit so they aren't perfectly straight - kind of like they're bowing their chest out.
- Rotate the hands back in just a little bit, closer to their original rotation. The result of this and the above is that the arms will look more natural and powerful than if they were simply 'hanging limp'.
- Do the same thing for the legs - rotate the legs out at the hip just a little bit, then rotate the hip back.
- Adjust the feet so they're flat on the ground. A little bit of additional outward rotation for the feet, so that the toes are pointing just a little more to the outside than the legs are, is also good.
- If you've made a frame, they're usually pretty big - so angle the head down just a little bit to help sell the scale you're going for. As with the arms, hands, etc, it doesn't take a lot of rotation to make the pose more dynamic.
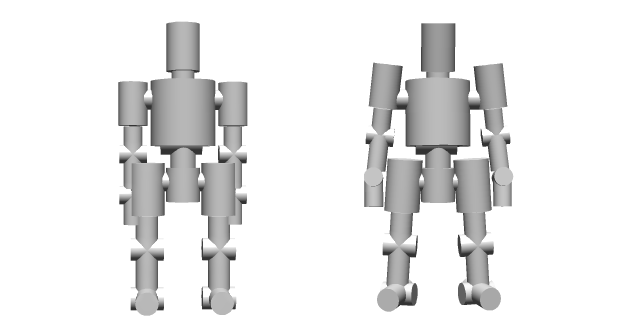
Those four tips can make even the simplest model feel more alive. And I really mean it - if you take a really basic model, just a bunch of pillars for its body parts for example, and pose it the way I described above it will still look pretty good. Don't believe me?
Both poses (other than the clipping issues) could be good - but the one on the right looks more dynamic.
Last bit of advice on this front: if you're doing your posing in Object mode, you can save yourself some time by deleting the limbs from one side and then duplicating the other side after it's been posed. Just be careful not to delete too much - or duplicate more than you need to.
Look at pose examples online or in your favorite shows to get an idea for what looks good. The pose pictured above is a very standard mecha pose!
Polygon Count
Okay, so you're a pro now. You're slapping parts together left and right. Your stuff looks amazing.
But you've reached a point where it takes FOREVER for your changes to stick. You go to drag a part around and it just chugs.
The fact is, DOGA is nowhere near as optimized as more professional programs like Blender are. The more polygons you add, the more DOGA has to work, and eventually you're going to start moving at a snail's pace. How many polys is 'too many' will depend on your machine. For me, it starts to get noticeable around 20-30k polys.
I've gone into the 70k poly range and each change took 10-20 seconds. I don't recommend it.
Here's some tips on how to avoid, or deal with, problems.
Save Often
DOGA will crash for pretty much any reason it can come up with, but this is extra true when your poly count gets high. Use 'Ctrl+S' constantly.
A word of warning: If you ever make a lot of changes and wish you could go back, DOGA's undo is pretty great about this. It doesn't persist after you close the program or open a new object, however. This is probably an obvious thing, but some people don't save often so they can go back to the last version they liked. If you're that type of person, I'd suggest saving the object under a new name from time to time to keep your 'last known good' version.
Only Build Half until it's Time to Render
I mentioned this above in the 'Duplicate, Duplicate, Duplicate' section, but seriously - save yourself some hassle and don't keep the whole thing on screen unless you have to. When your poly count starts to increase, cutting half of the polys out until you need them will save you a ton of time.
Avoid Overly Complicated Parts
Some parts will add 400-3000 polys all at once. You can watch the count go up at the bottom right of the application. Add a part, see the number, repeat if needed.
- For small details, you may be able to use one or more lower-poly parts to achieve the same results. This is especially true with the basic parts. A few of those stacked will sometimes give you the same result as a part with hundreds of polys.
- Try not to make high poly parts very small. Essentially the same as above, it can be tempting to use a complicated part and shrink it down until it's nearly gone. The problem with this approach is that the poly count remains unchanged. If you can replace a small, high-poly part with a small, low-poly part, you may help yourself out in the long run.
- If you can't see it, get rid of it.
- Let's say that we're making a transport ship. It might be awesome to detail out the interior, but if we can't see it - it's just eating up polys. A great solve for this is to save your file under a new name (transport_internal, for example) and cut away the parts of the exterior that might not be necessary. On the 'external' view, you can cut out all the internals. Do this wisely - if you have an exposed bridge/cockpit/etc, then there is value in keeping that area visible in the external view.
- Sometimes, parts just get lost. You stack on top of them, then stack again, etc, until that original shape just isn't visible anymore. If you spot these, get rid of them immediately unless you have a reason to keep them.
Simplify your Design
Okay, you've gotten rid of the things you felt like you could have, but your count is still way too high.
It may be time to find a way to make your design less complex. Remove some unnecessary greebles, switch to parts that aren't as good but still get the job done, etc. This might be hard to do, but if it's impossible to continue working on your model, then the time has probably come to make some hard decisions.
Acceptance
You've arrived at the final stage of grief and none of the above tips have helped you.
There may not be anything you can do without sacrificing the look you're going for. It happens. Just get comfortable with things taking a long time to take effect and save often.
If your poly count is REALLY high, you may run a risk of not being able to load your file anymore. This has only happened to me once or twice and continued attempts eventually worked - but it's not a good feeling.
While this tip might be all about Accepting that your model just has too many polys and you have to deal with it - it might also be time to Accept that you need to go back to the previous tips and find a way to implement some of them, even if you're not 100% happy with the result.
OOC Notes
Whisper created this article on 2021/03/15 10:04.
🚧 This article is a work-in-progress. Is it not currently approved.
Page Tools
Terms of Service - Privacy Policy
